

Welcome Davis in the world of development and automation. Today, we are drowning in an exciting project in which we will create server -laser image processing pipeline with AWS services.
The project begins with making S3 buckets to store uploaded images and processed thumbnoles, and eventually many services such as Lambda, API Gateway (to mobilize the Lambeda Function), Dinomod B (to store the image metad data), and we will finally make this program in this program.
The project is filled with the next dot JS, such as Cloud Services and Development Tech Stics, and practicing it will further enhance your cloud services and how they interact with each other. So with more Ado, let’s start!
Note: Code and instructions in this post are only for demo use and learning. The productive environment will require strict grip on structures and security.
Provisions
Before going to the project, we have to make sure that our system meets the following requirements:
- An AWS account: Since we use AWS services for this project, we need AWS account. A created IAM will be appreciated with access to the desired services.
- Basic understanding of AWS services: Since we are dealing with a lot of AWS services, it is better to get well about them, such as S3, which is used for storage, API gateway to mobilize the Lambeda function, and more.
- Node is installed: Our Front & next dot J, so your system must have a node.
For the code reference, it is Gut Hub Rippo.
AWS Services Setup
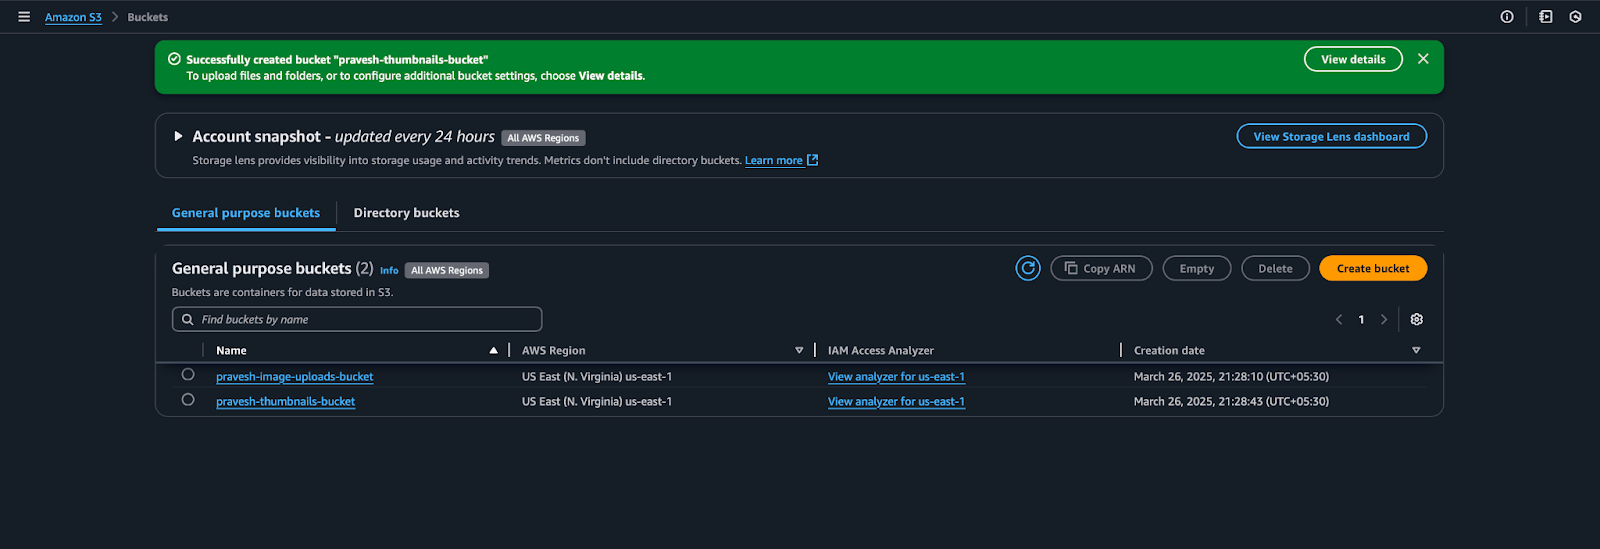
We will start by project Establish our AWS services. First and foremost is that we will make 2 s3 buckets, ie sample-image-uploads-bucket And sample-thumbnails-bucket. The reason for this long name is that the bucket name should be unique in AWSwork space.
So to make the bucket, move towards the S3 dashboard and click on ‘bucket creation’, select ‘Normal Purpose’, and give it a name (sample image-upload-boocate) and leave the rest of the sequence as default.
Likewise, make the second bucket called Nels-Boocate under the sample, but in this bucket, make sure you Non -check block public access Because we will need it for our ECS cluster.


We have to make sure that the bulbbat under the sample has access to public reading, so that the ECS Front and can disclose them. L. We will connect the following policy to this bucket:

{
"Version": "2012-10-17",
"Statement": (
{
"Sid": "PublicRead",
"Effect": "Allow",
"Principal": "*",
"Action": "s3:GetObject",
"Resource": "arn:aws:s3:::sample-thumbnails-bucket/*"
}
)
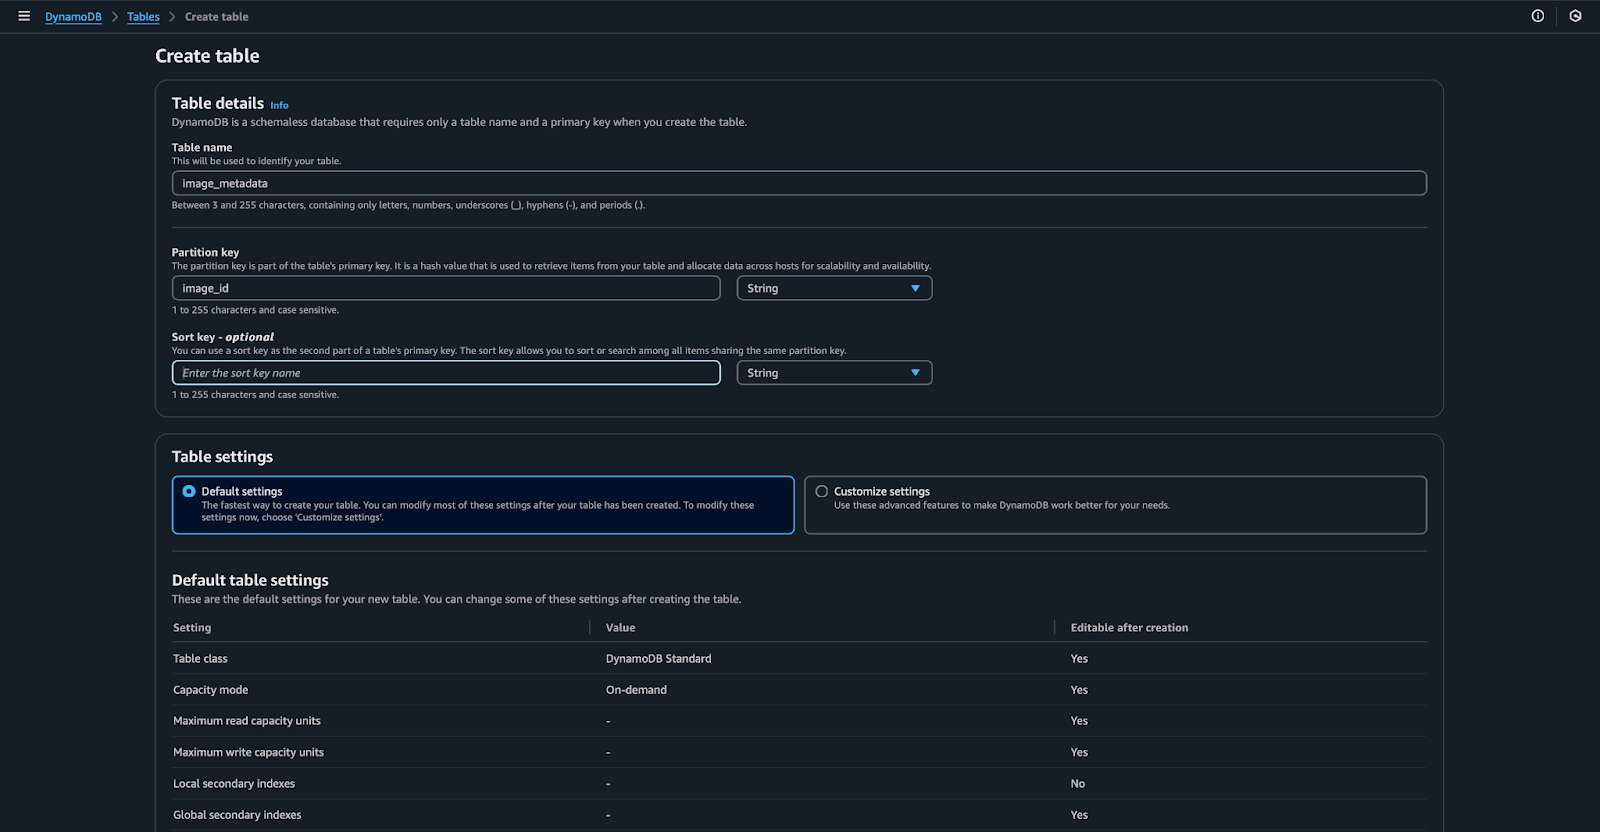
}After making buckets, let’s go to your database to store the image metadata. We will create a dynamodb table for it. Go to your Dinomode B Console, click on the table, give it a name (image_mesta), and select in the basic key, in the string, tell the name. image_id.
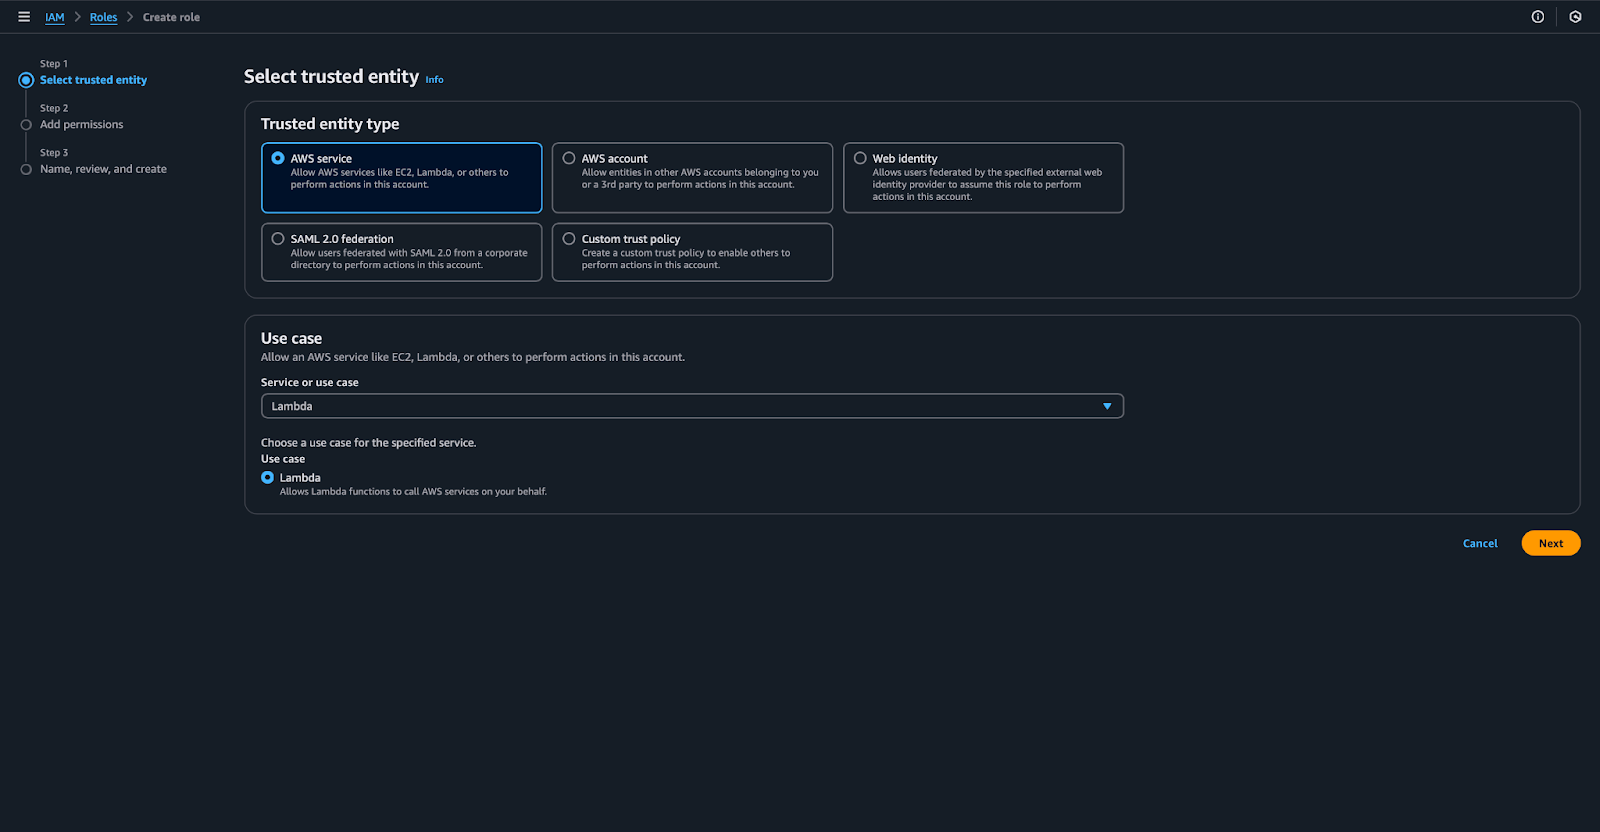
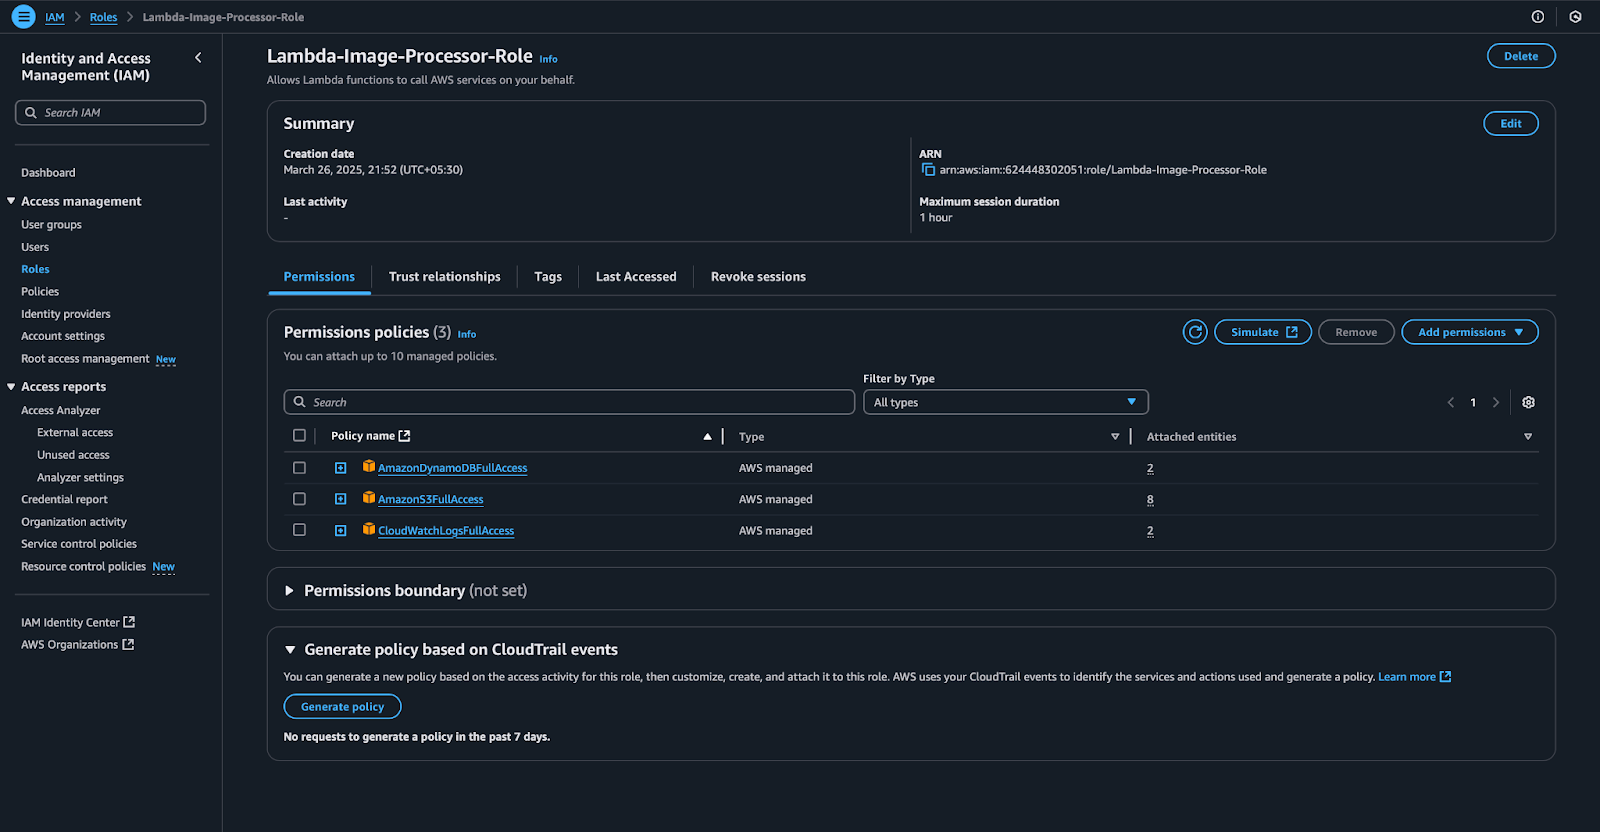
AWS services will interact with each other, so they need a role with appropriate permission. To make a role, go to the IAM dashboard, select the character, and click on the role of creation. Under it Type of confidence identificationSelect AWS Service, And under this Use the caseChoose Lambida. Attach the following policies:
- Amazon 3 Fulls
- Amazonnamodeblaixis
- Cloud Wachlagsfl Les
Give this character a name (Lambda image processor roll) and save it.
Making a Lamba Function
We have the role of Lambda, buckets, and dinumoid b -tables, so now let’s create a Lambda function that will take action on the icon and remove the thumbnail out, as we are using the pillow library to take pictures of the pictures, the Lamba is not before. To fix it, we will add a layer to the Lambda function. To do this, follow the following steps:
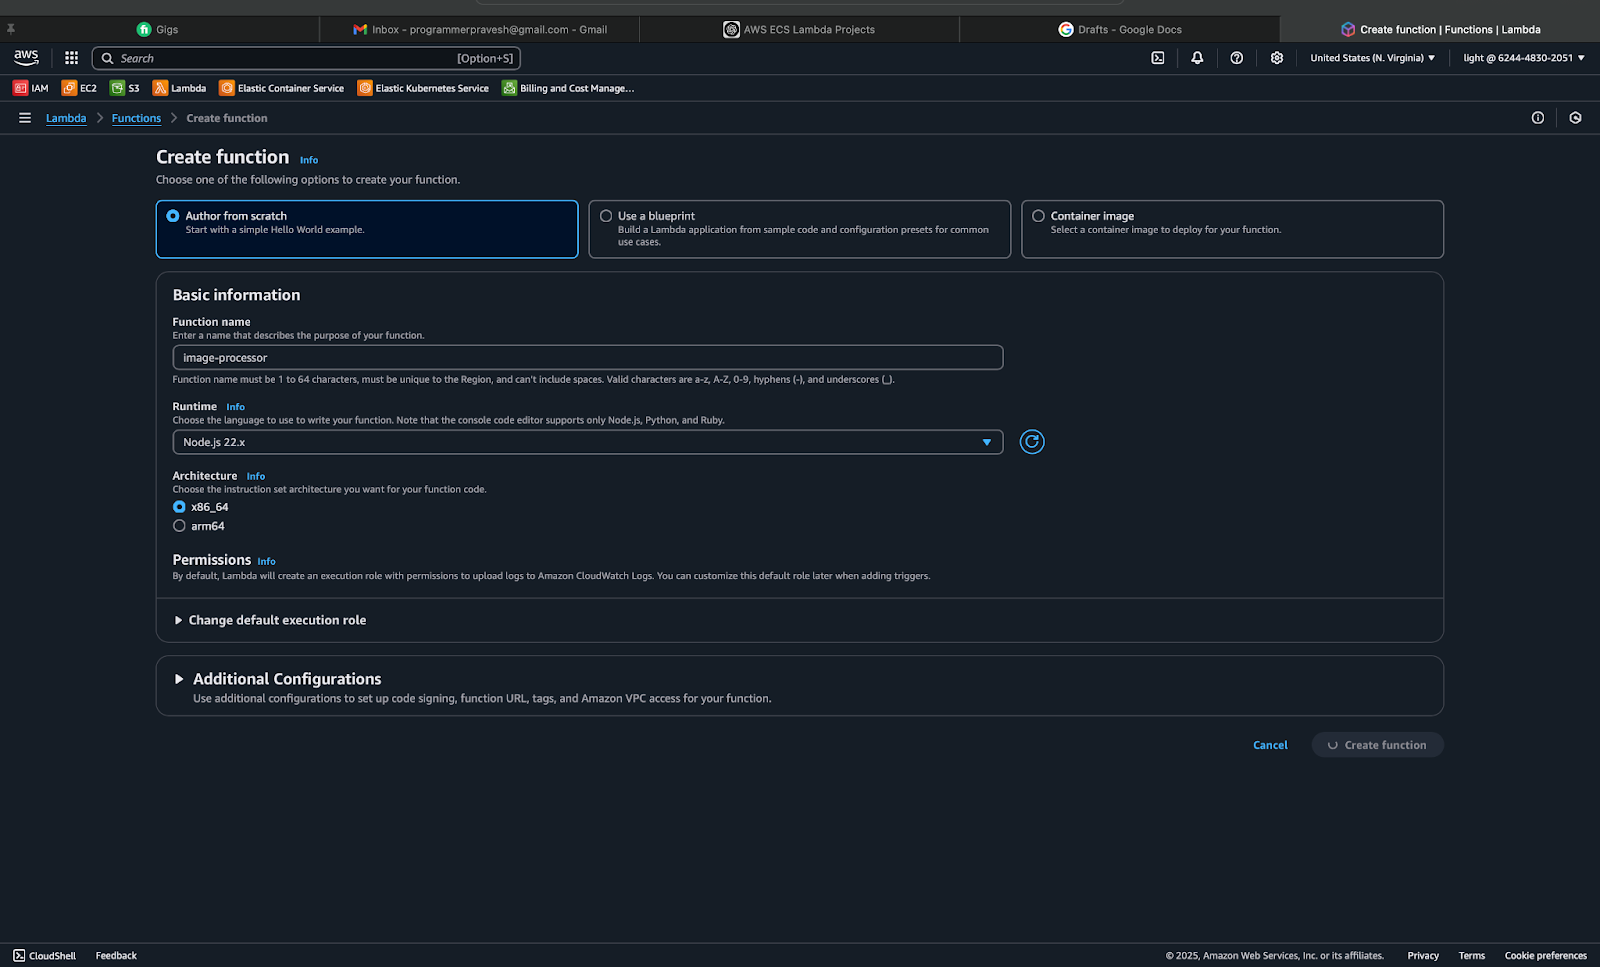
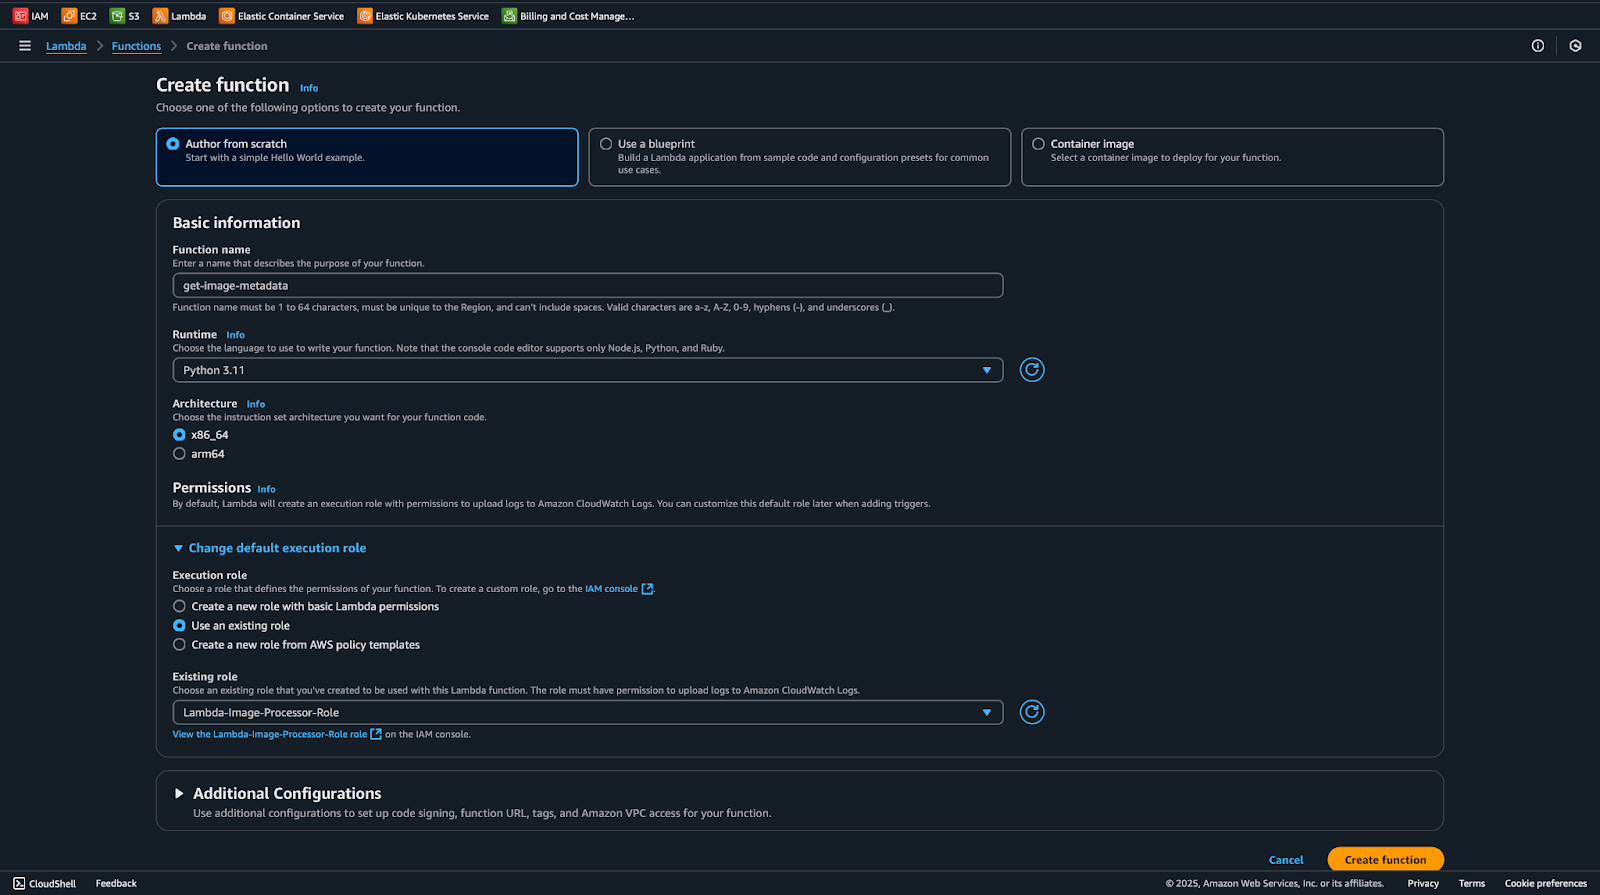
Go to you now Lambda Dashboard, click Make a function. Select The writer from the beginning And select 399 As a run -time language, give it a name: Image processor, and I Code Tab, you have Upload from Option, select it, select Zipper File, and I upload your zip file of IMage processor.
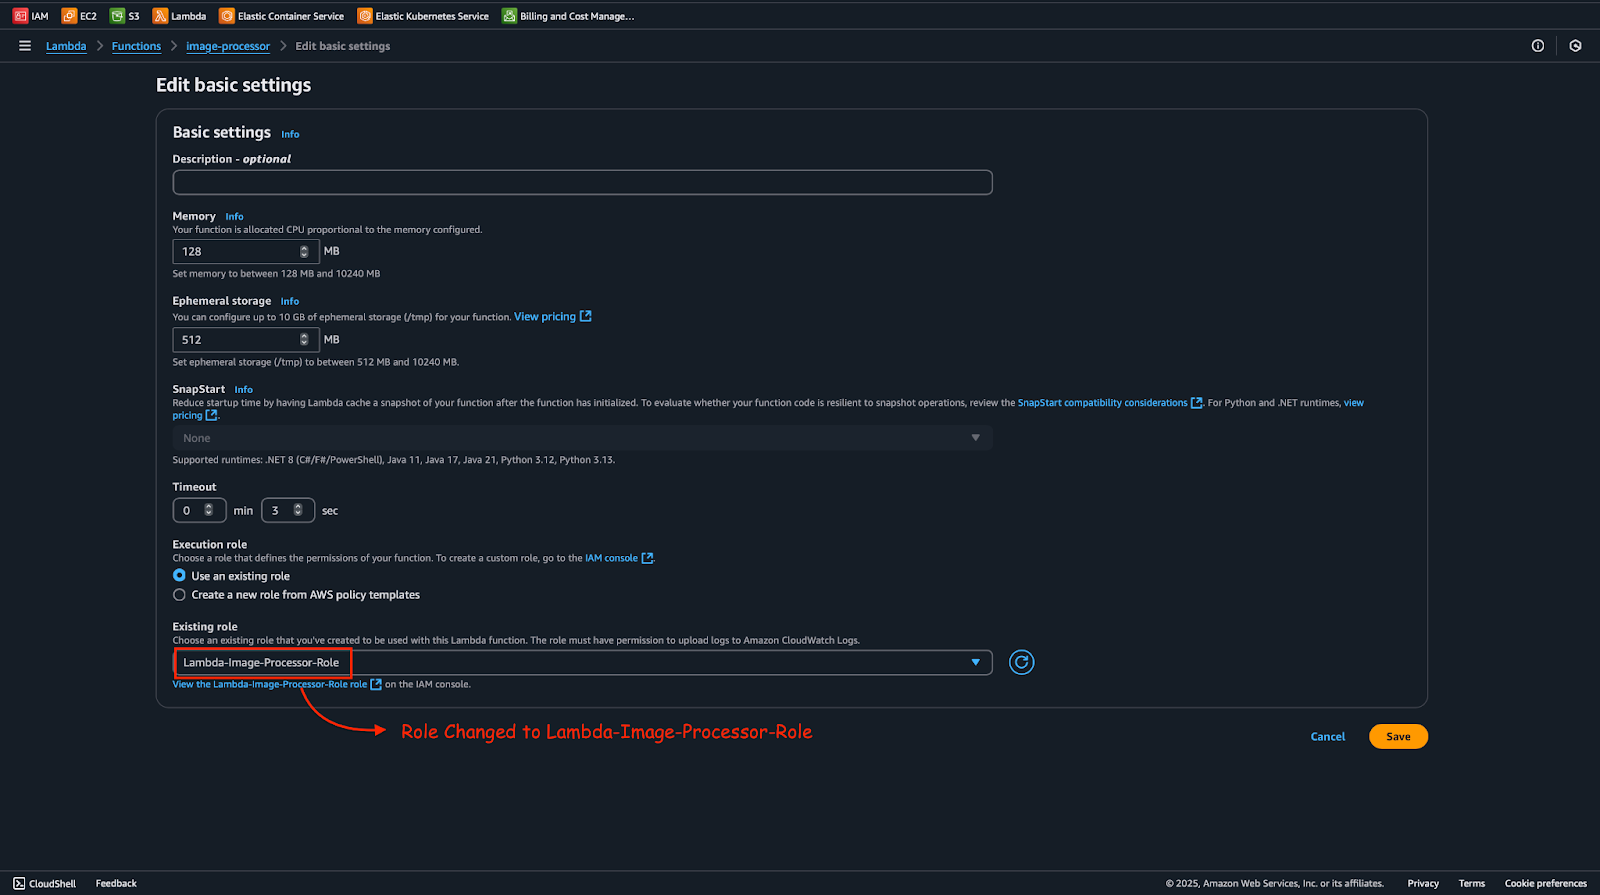
Barley SequenceAnd under his Permission Column, edit the configuration To change the current character For this role we created the Lambda image processor roll.
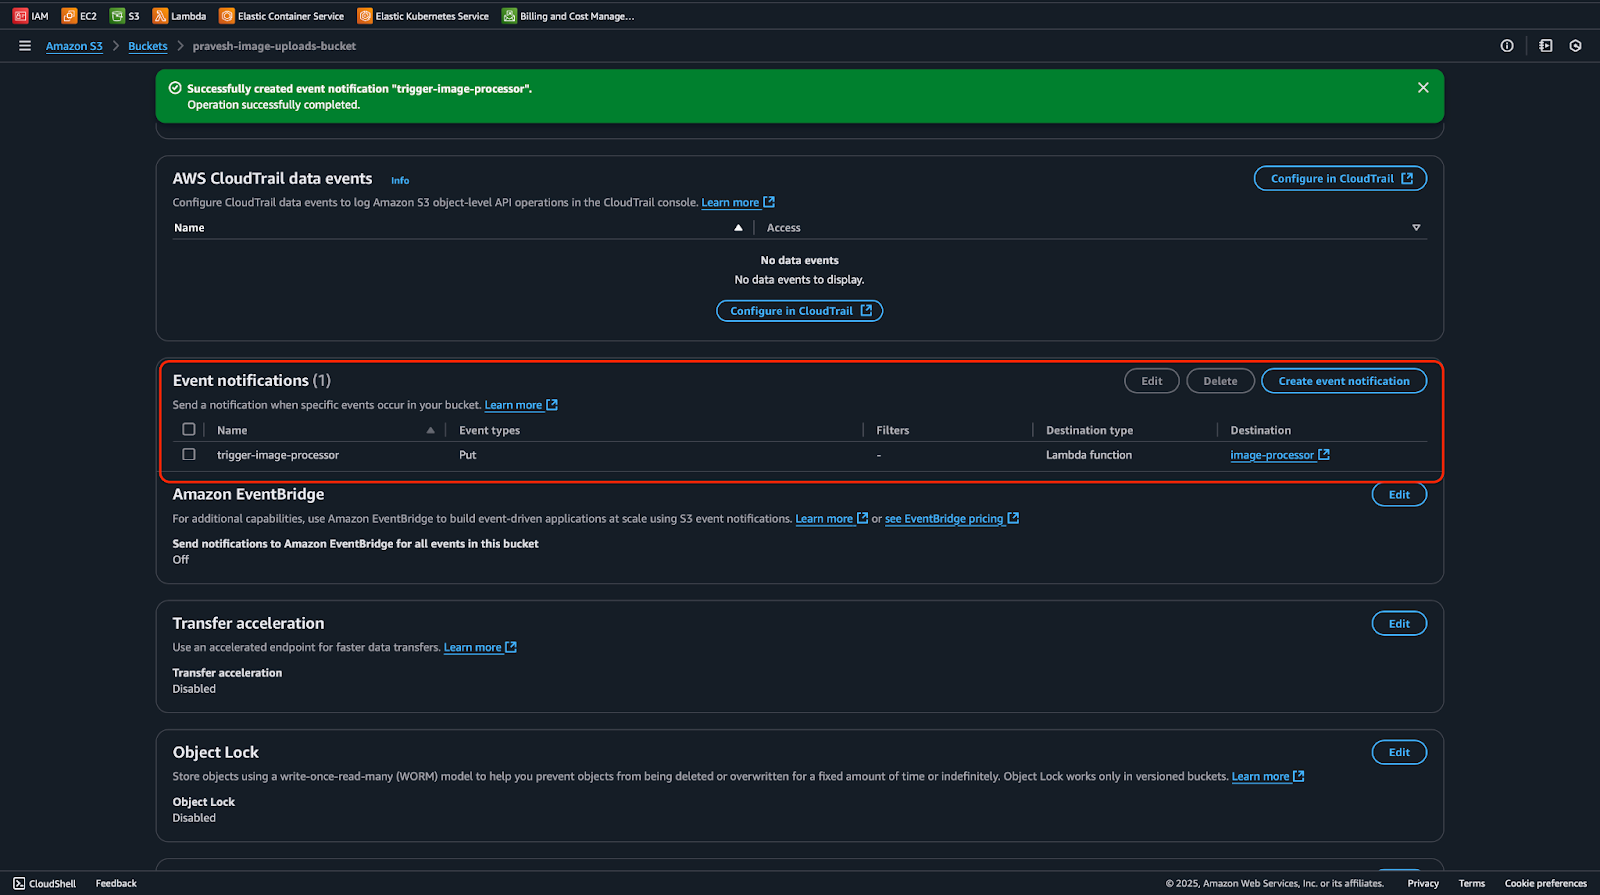
Now go to your S3 bucket (Sample Image Uploads-Back) And go to him Specialty Section and scroll down Event notifricityn, click here Make the incident reportGive it a name (trigger image processor) and in the event of an event, select the pot and select the Lambda function we have created (image processor).
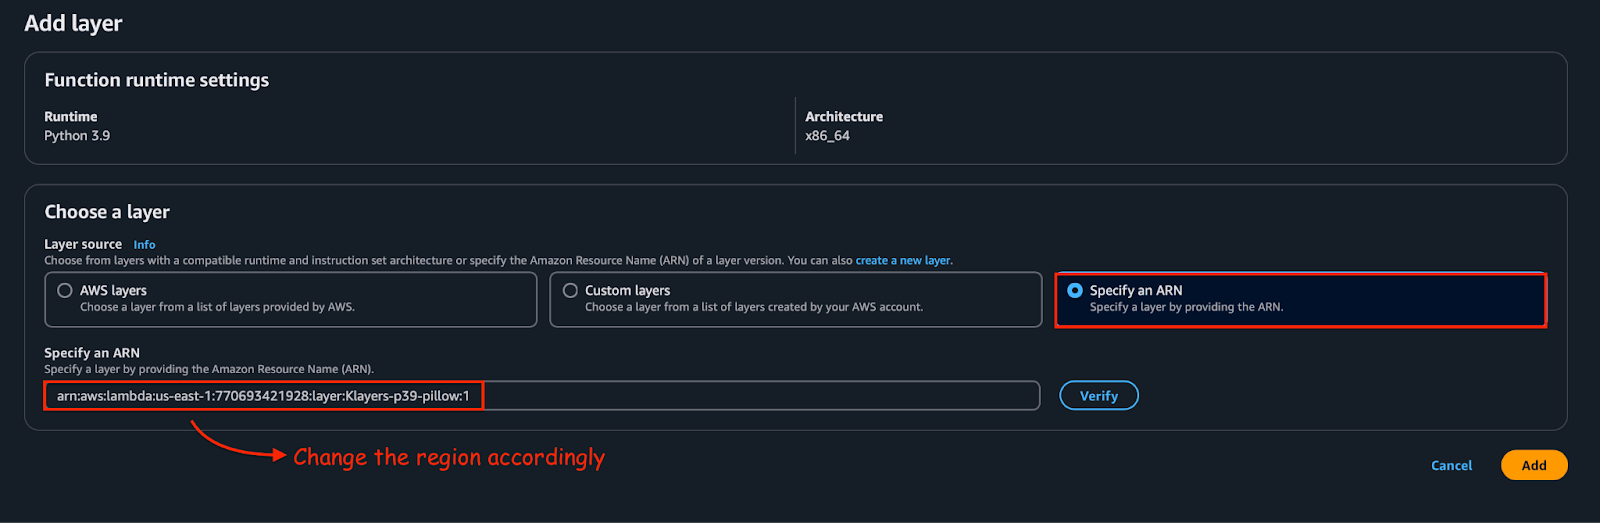
Now, since the pillow with the Lambda Library does not come in, we will take the following steps to fix it:
- Go to your Lamba Function (iMage processor) And scroll down Layer Section, click here Add the layer.
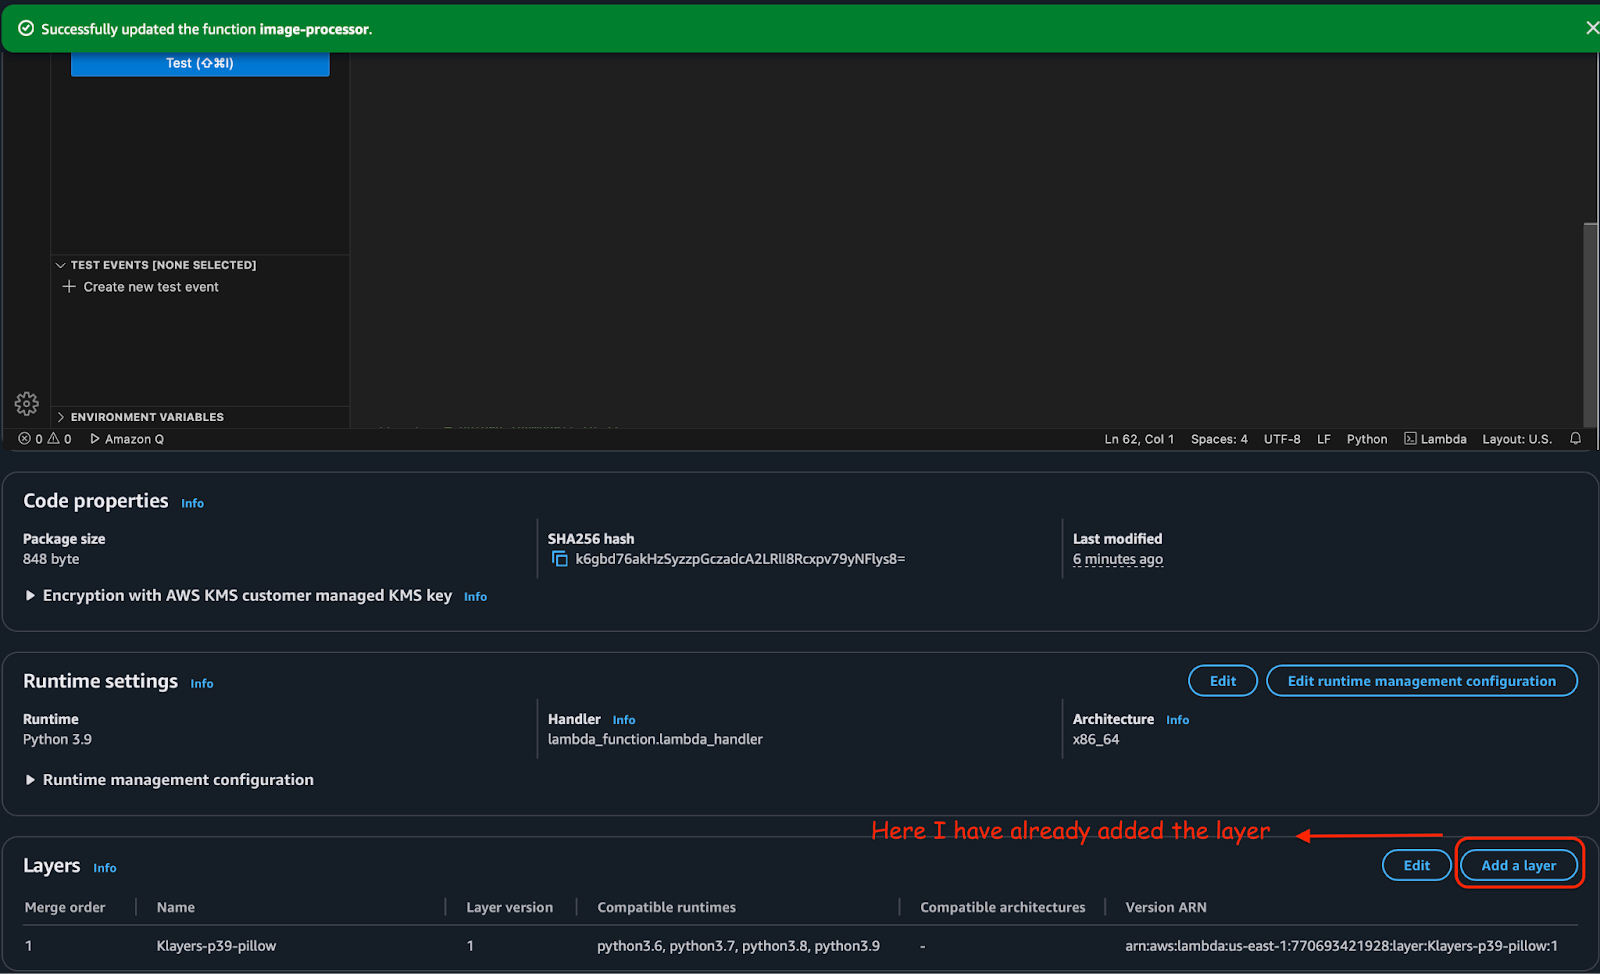
- I Add the layer Section, select Specify an arin And provide this arin
arn:aws:lambda:us-east-1:770693421928:layer:Klayers-p39-pillow:1. Change the region accordingly; I’m using US-EAST-1. Add the layer.
Now you will be getting the Lambeda function in your Lamba Function Code tab. Lambda_Fonction.P.:
import boto3
import uuid
import os
from PIL import Image
from io import BytesIO
import datetime

s3 = boto3.client('s3')
dynamodb = boto3.client('dynamodb')

UPLOAD_BUCKET = ''
THUMBNAIL_BUCKET = ''
DDB_TABLE = 'image_metadata'

def lambda_handler(event, context):

    record = event('Records')(0)
    bucket = record('s3')('bucket')('name')
    key = record('s3')('object')('key')


    response = s3.get_object(Bucket=bucket, Key=key)
    image = Image.open(BytesIO(response('Body').read()))


    image.thumbnail((200, 200))


    thumbnail_buffer = BytesIO()
    image.save(thumbnail_buffer, 'JPEG')
    thumbnail_buffer.seek(0)


    thumbnail_key = f"thumb_{key}"
    s3.put_object(
        Bucket=THUMBNAIL_BUCKET,
        Key=thumbnail_key,
        Body=thumbnail_buffer,
        ContentType='image/jpeg'
    )


    image_id = str(uuid.uuid4())
    original_url = f"https://{UPLOAD_BUCKET}.s3.amazonaws.com/{key}"
    thumbnail_url = f"https://{THUMBNAIL_BUCKET}.s3.amazonaws.com/{thumbnail_key}"
    uploaded_at = datetime.datetime.now().isoformat()

    dynamodb.put_item(
        TableName=DDB_TABLE,
        Item={
            'image_id': {'S': image_id},
            'original_url': {'S': original_url},
            'thumbnail_url': {'S': thumbnail_url},
            'uploaded_at': {'S': uploaded_at}
        }
    )

    return {
        'statusCode': 200,
        'body': f"Thumbnail created: {thumbnail_url}"
    }
Now, we will need another Lambeda function for the API gateway as it will work as an entry point for our Front and ECS app to bring image data from Dynamode B.
To make the Lamba Function, go to yourself Lambda dashboardClick Make a functionSelect The writer from the beginning And 399 As a run -time, give it a name, gate image metata, and in order, select the same character we assigns other Lamba functions (((Lambda Image Processor-RowlJes
Now, in the function code section, put the following content:
import boto3
import json

dynamodb = boto3.client('dynamodb')
TABLE_NAME = 'image_metadata'

def lambda_handler(event, context):
    try:

        response = dynamodb.scan(TableName=TABLE_NAME)


        images = ()
        for item in response('Items'):
            images.append({
                'image_id': item('image_id')('S'),
                'original_url': item('original_url')('S'),
                'thumbnail_url': item('thumbnail_url')('S'),
                'uploaded_at': item('uploaded_at')('S')
            })

        return {
            'statusCode': 200,
            'headers': {
                "Content-Type": "application/json"
            },
            'body': json.dumps(images)
        }

    except Exception as e:
        return {
            'statusCode': 500,
            'body': f"Error: {str(e)}"
        }
Make API gateway
API Gateway will serve as your ECS Front and Application Entry Point to bring image data from Dynamodb. It will be connected to the Lamba Function, which inquires from Dynamode B and returns the image metadata. The gateway is used in our Front & App to display URL images. To make the API gateway, take the following steps:
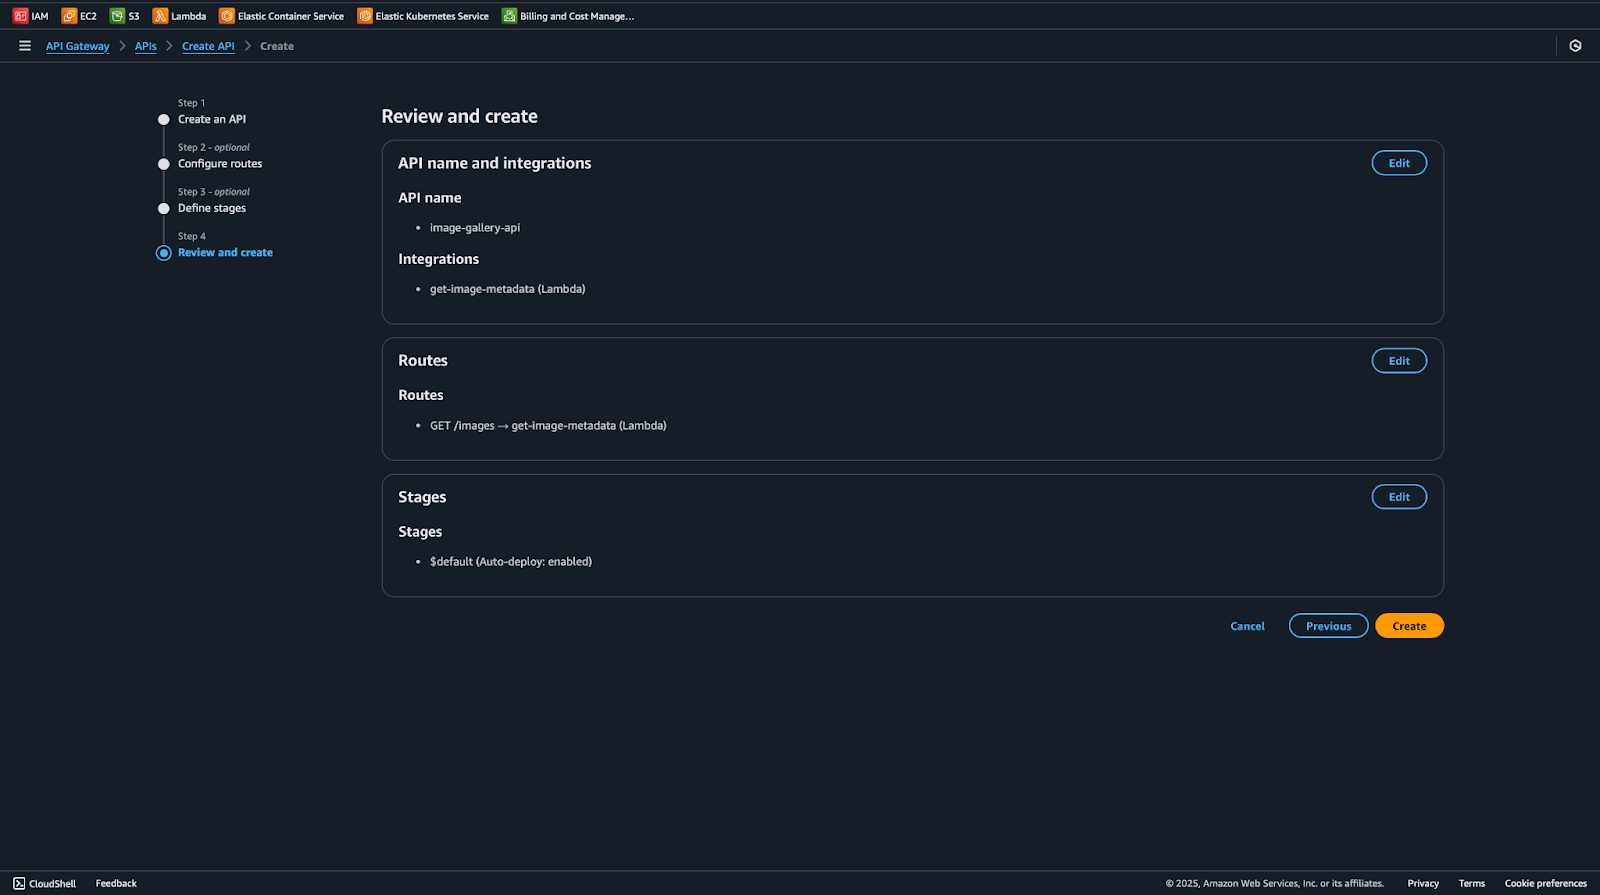
- Go to AWS Management Console → Find API Gateway → Click Make API.
- Select Http api.
- Click Set.
- API’s name: Image Gallery-OP
- Add the integration: Select Lamba and get_image_metadata function
- Select Method: Get and Way: /Pics
- Type of closing point: Regional
- Click Next And make the API gateway URL.
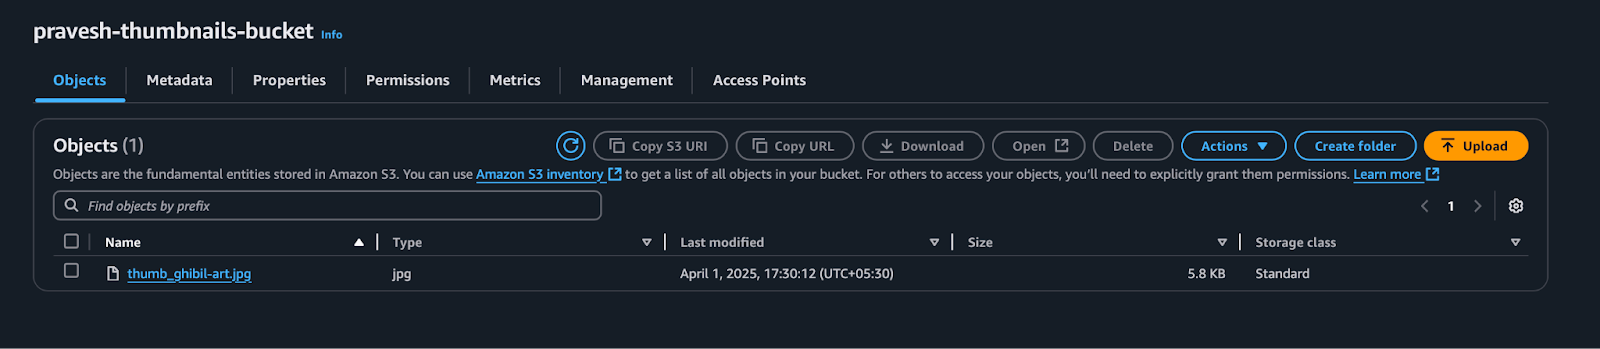
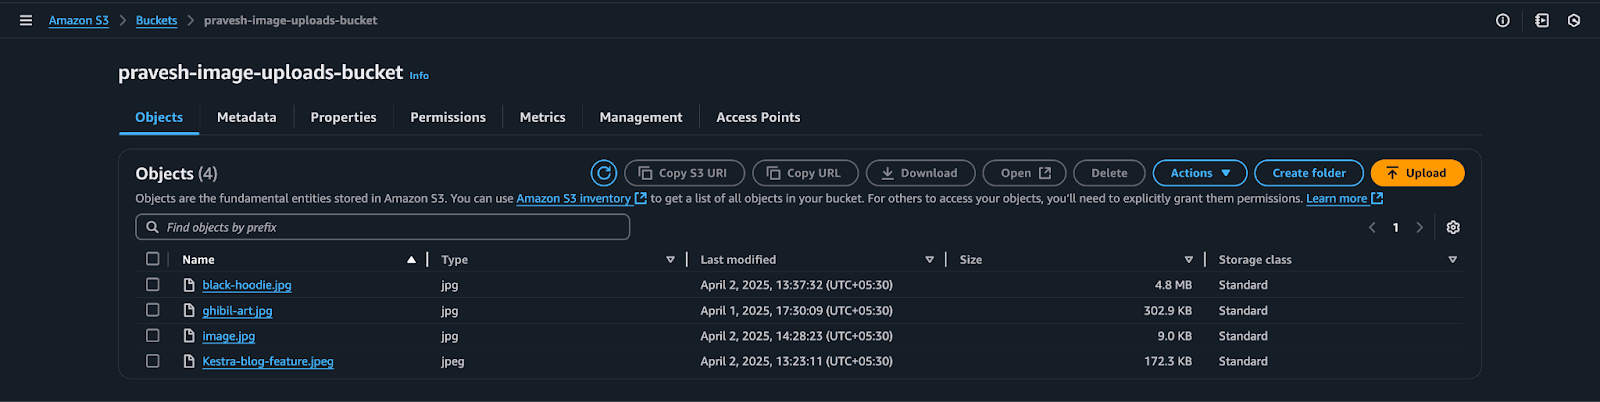
Before making the front end, let’s manually check the application. First go to your upload S3 bucket (Sample Image Uploads-Back) And upload A JPG/JPEG Image; The second picture won’t work because your function only processes these two types:
In the above photo, I have uploaded a photo that is titled “GHibil-Aart.jpg“The file, and once it is uploaded, will mobilize the Lamba function, which will make the thumbnail by its name.Thumbnail-Gul-Art.GPG“And keep it in Sample Thumm Nells-Back And will be stored in information about the image Image Metta Table in Dynamodb.

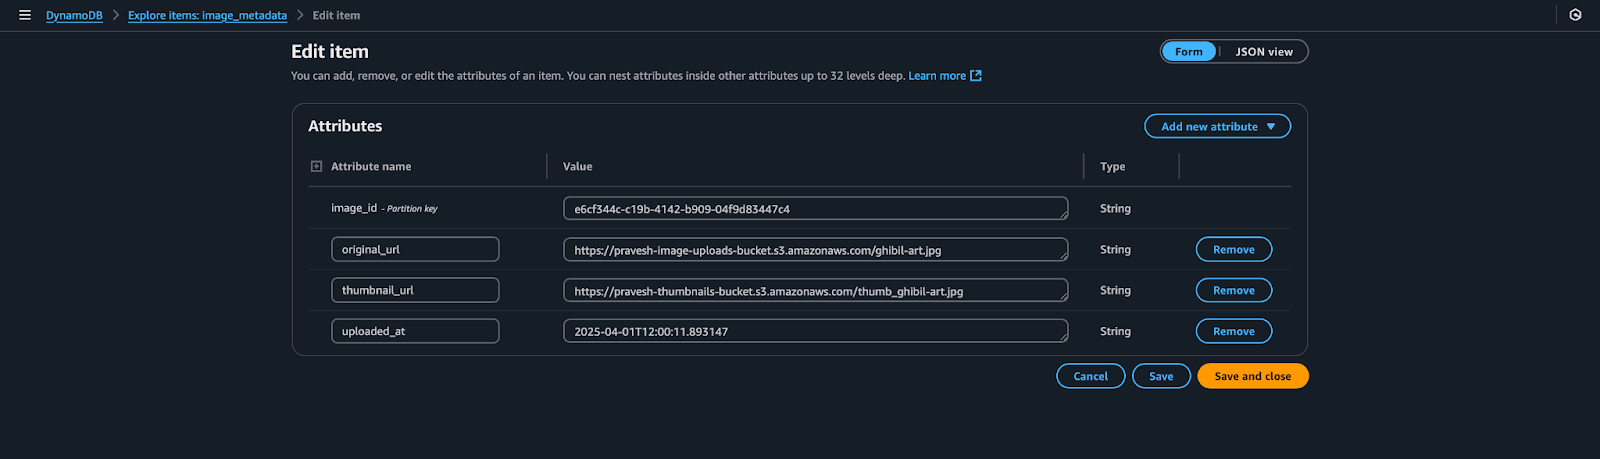
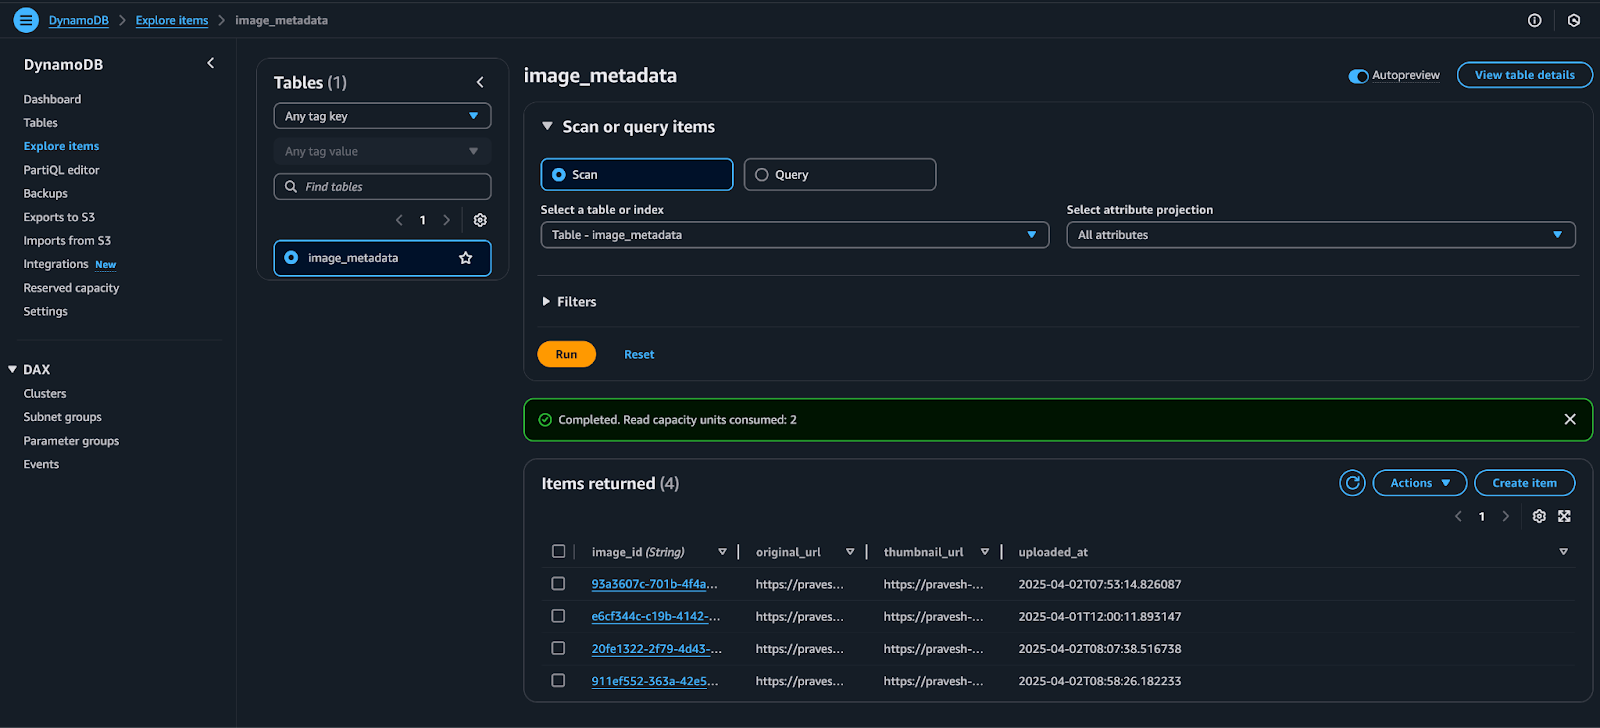
In the aforementioned photo, you can see the item within the Explore Item section of our Dynamode B Table.Image metatata.“API-Gateway Testing We, We will check our image gallery API’s URL after which /photos. It will show the following output with the Curl Command:

Now our application is doing well, we can deploy the front and deploy to see the project.
To create a front & app
For simplicity, we will make a minimal, simple gallery Frontand using Next J., do drunk it, and deploy it to the ECS. To make the app, take the following steps:
Initiation
npx create-next-app@latest image-gallery
cd image-gallery
npm install
npm install axios
Make a gallery component
Create a new file components/gallery:
'use client';
import { useState, useEffect } from 'react';
import axios from 'axios';
import styles from './Gallery.module.css';
const Gallery = () => {
const (images, setImages) = useState(());
const (loading, setLoading) = useState(true);
useEffect(() => {
const fetchImages = async () => {
try {
const response = await axios.get('https:///images' );
setImages(response.data);
setLoading(false);
} catch (error) {
console.error('Error fetching images:', error);
setLoading(false);
}
};
fetchImages();
}, ());
if (loading) {
return <div className={styles.loading}>Loading...</div>;
}
return (
<div className={styles.gallery}>
{images.map((image) => (
<div key={image.image_id} className={styles.imageCard}>
<img
src={image.thumbnail_url}
alt="Gallery thumbnail"
width={200}
height={150}
className={styles.thumbnail}
/>
<p className={styles.date}>
{new Date(image.uploaded_at).toLocaleDateString()}
</p>
</div>
))}
</div>
);
};
export default Gallery;Sure Gateway-YoL to your API_GATEWAY_URL
Add CSS module
Ingredients/Gallery. Create CCSS:
.gallery {
  display: grid;
  grid-template-columns: repeat(auto-fill, minmax(200px, 1fr));
  gap: 20px;
  padding: 20px;
  max-width: 1200px;
  margin: 0 auto;
}
.imageCard {
  background: #fff;
  border-radius: 8px;
  box-shadow: 0 2px 5px rgba(0,0,0,0.1);
  overflow: hidden;
  transition: transform 0.2s;
}
.imageCard:hover {
  transform: scale(1.05);
}
.thumbnail {
  width: 100%;
  height: 150px;
  object-fit: cover;
}
.date {
  text-align: center;
  padding: 10px;
  margin: 0;
  font-size: 0.9em;
  color: #666;
}
.loading {
  text-align: center;
  padding: 50px;
  font-size: 1.2em;
}
Update homepage
Edit the App/Page Dot JS:
import Gallery from '../components/Gallery';

export default function Home() {
  return (
    <main>
      <h1 style={{ textAlign: 'center', padding: '20px' }}>Image Gallery</h1>
      <Gallery />
    </main>
  );
}
Next Dot JS’s Built -in image component
Improved correction LEXT Next to use the built -in image component of JS, updates Next. MJS:
const nextConfig = {
  images: {
    domains: ('sample-thumbnails-bucket.s3.amazonaws.com'),
  },
};

export default nextConfig;
Run the application
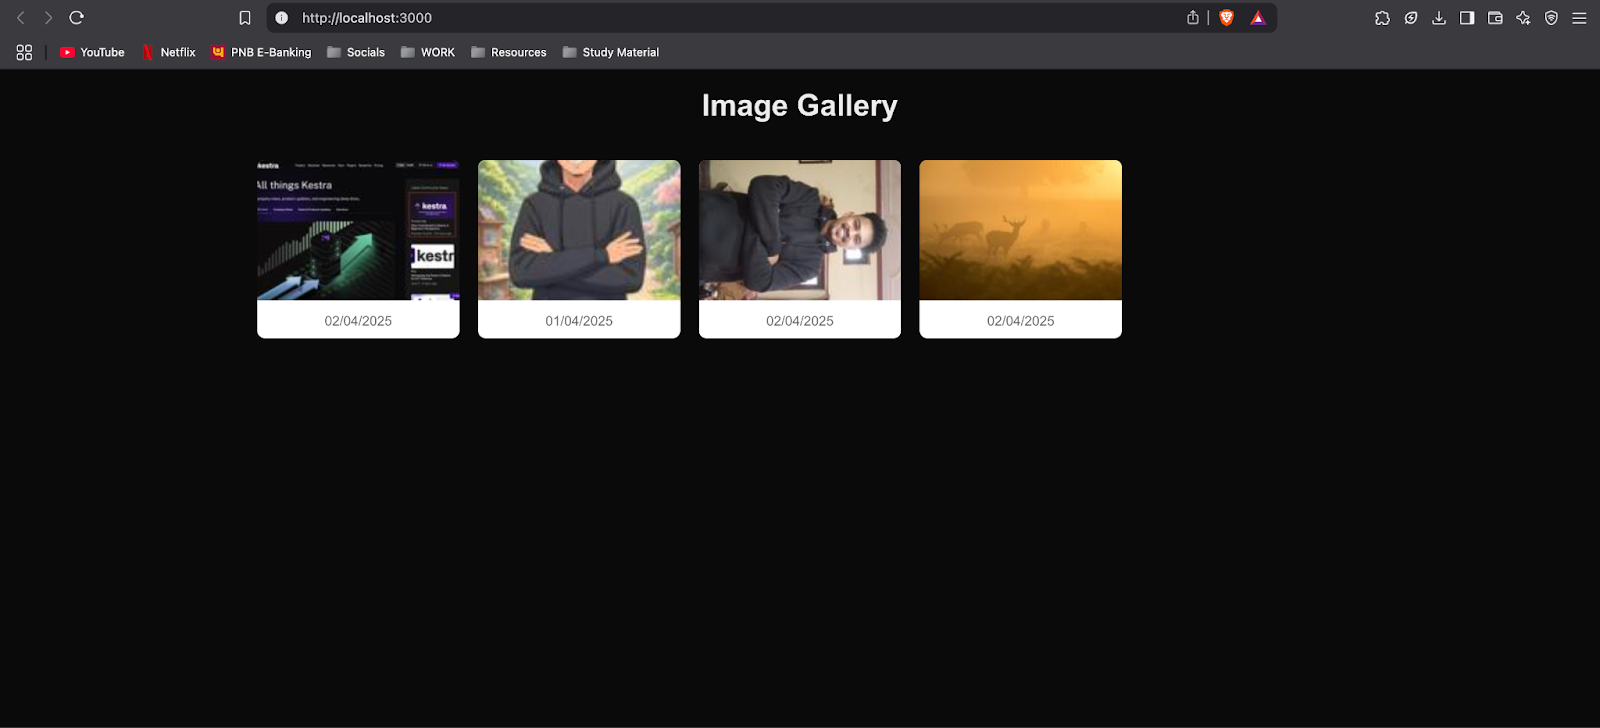
See your browser, and you will see that the application is running with all the thumbnases uploaded.
For the purposes of the demonstration, I have put four photos (JPEG/JPG) in my sample image-up-boocate. Through the function, they turn into thumbnases and store it in the nail below the sample.

The application looks like this:
ECS Cluster to contain and create containerizing and
Now we have almost worked with the project, so we will continue to create a dock file of the project.
# Use the official Node.js image as a base
FROM node:18-alpine AS builder

# Set working directory
WORKDIR /app

# Copy package files and install dependencies
COPY package.json package-lock.json ./
RUN npm install

# Copy the rest of the application code
COPY . .

# Build the Next.js app
RUN npm run build

# Use a lightweight Node.js image for production
FROM node:18-alpine

# Set working directory
WORKDIR /app

# Copy built files from the builder stage
COPY --from=builder /app ./

# Expose port
EXPOSE 3000

# Run the application
CMD ("npm", "start")
Now we will create a Dokar image using:
docker build -t sample-nextjs-app .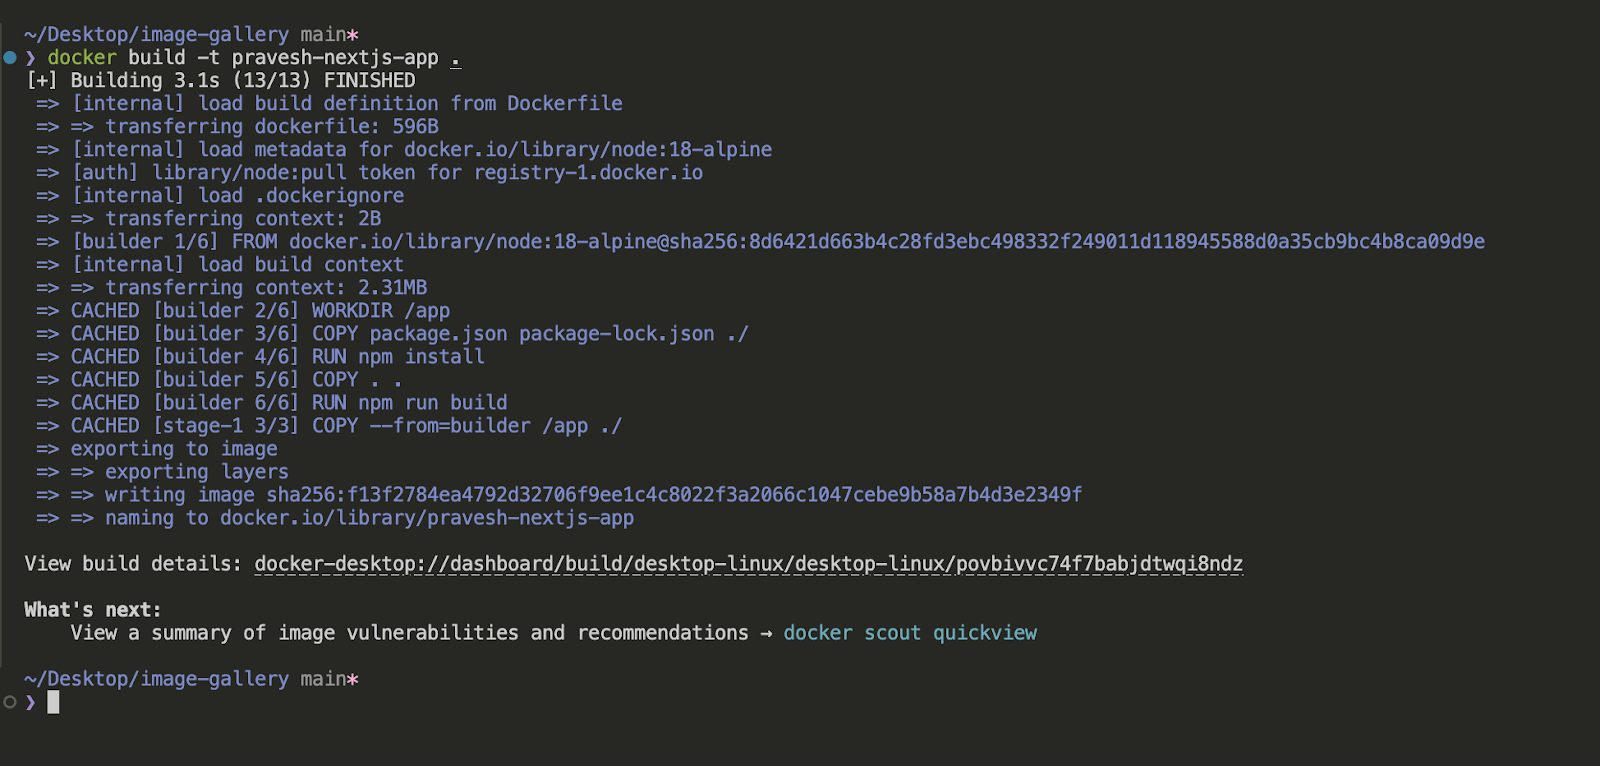
Now that we have our Dokar Image, we will push it towards AWS ECR Repo, for that, take the following steps:
Step 1: Press the Dokar Image to Amazon ECR
- Go to AWS Management Console → Find ECR (Flexible Container Registry) → open ECR.
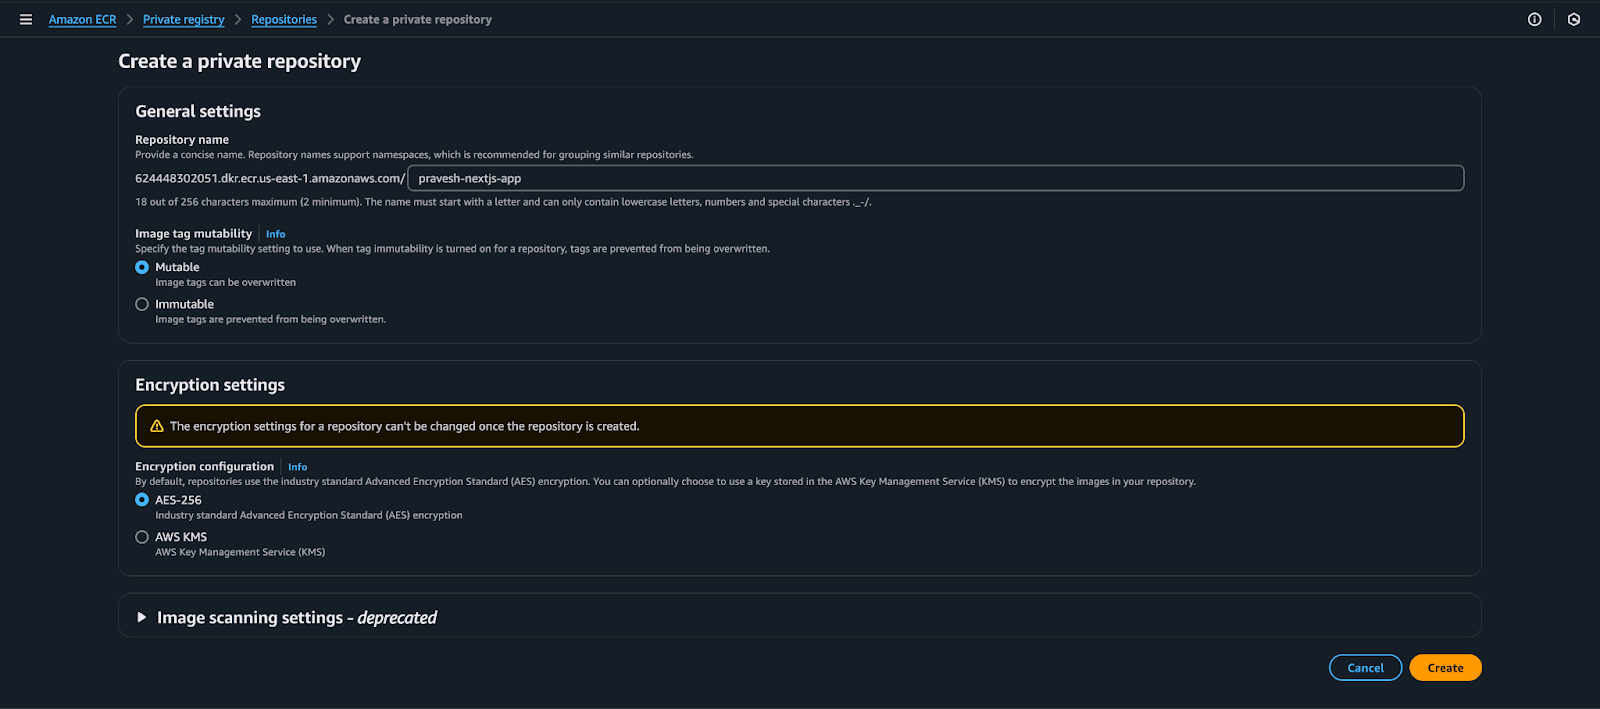
- Make a new repository:
- Click Create a repository.
- Set The stored name (For example, sample-Nextjs-RAP).
- Select Private (Or Public If needed).
- Click Create a repository.
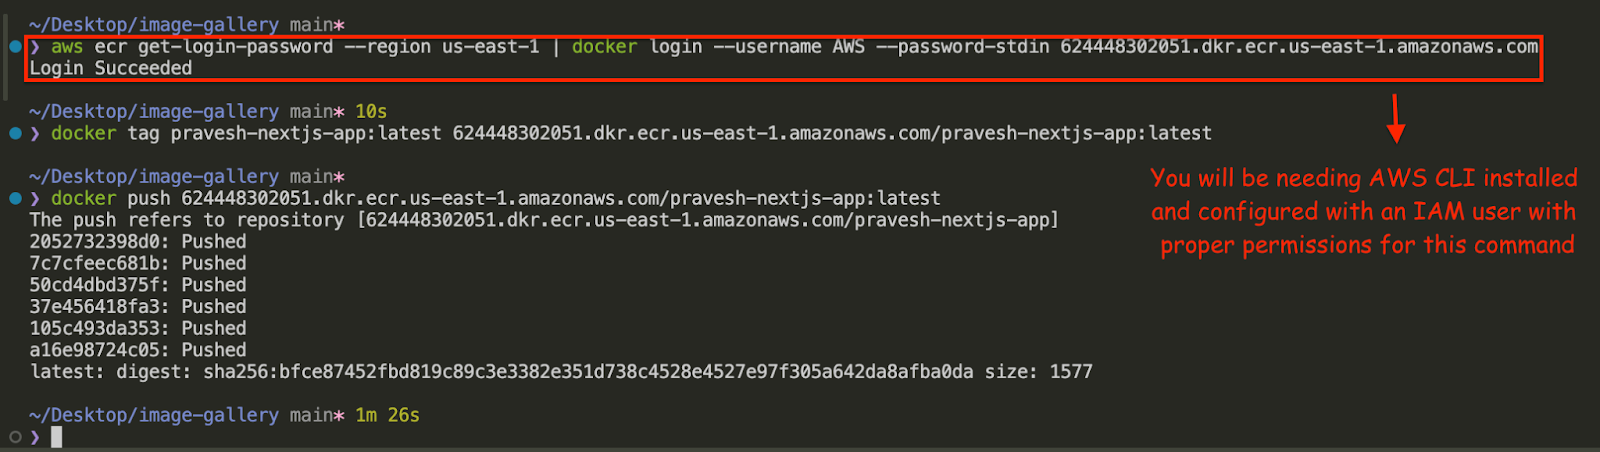
- Push your Dokar image on ECR:
- Click in the newly created repository, See Push orders.
- Follow orders:
- Confirm the Doker with the ECR.
- Make your image, tag, and press.
- You need to create AWS CLI for this move.
Step 2: Make ECS Cluster
aws ecs create-cluster --cluster-name sample-ecs-clusterStep 3: Make a Task Implement
- In the ECS ConsoleGo, go The work appreciation.
- Click Create new Task praise.
- Select Foreigate → Click The next step.
- Set the Task definition details:
- Name: sample-nicist JS Task
- Task Roll: Extract (Make one if lost).
{
  "Version": "2012-10-17",
  "Statement": (
    {
      "Sid": "Statement1",
      "Effect": "Allow",
      "Action": (
        "ecr:GetDownloadUrlForLayer",
        "ecr:BatchGetImage",
        "ecr:GetAuthorizationToken",
        "ecr:BatchCheckLayerAvailability"
      ),
      "Resource": "arn:aws:ecr:us-east-1:624448302051:repository/sample-nextjs-app"
    }
  )
}- Task Memory and CPU: Choose proper values (such as, 512MB and 256 CPU).
- Explain the container:
- Click Add the container.
- The name of the container: Sample-Nextjs-Container.
- Image URL: Paste ECR Image URI From Step 1.
- Port mappings: Set 3000 For both containers and host ports.
- Click Add.
- Click Create.
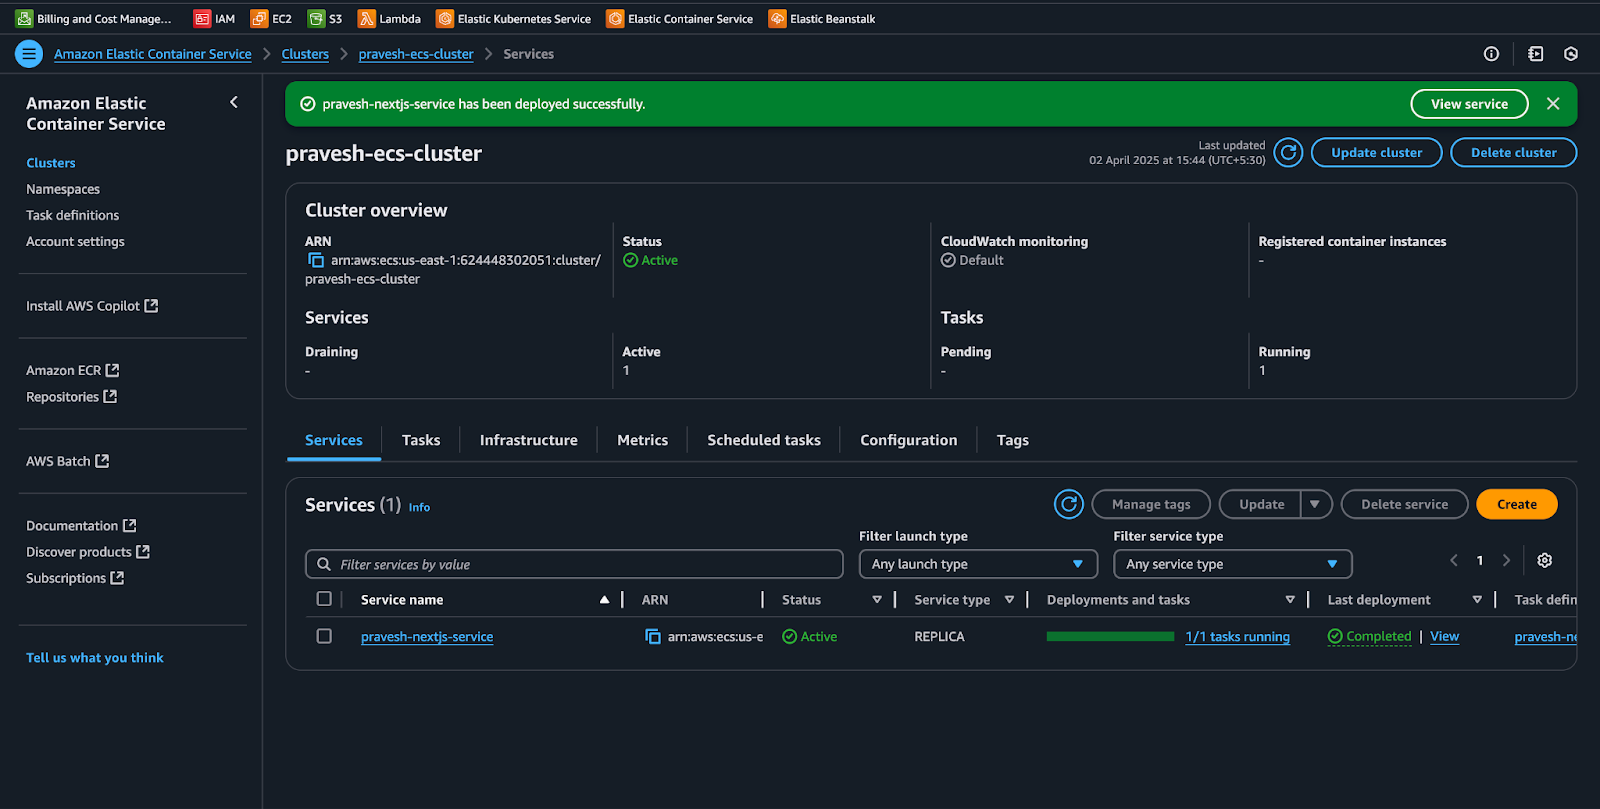
Step 4: Create ECS Service
- Go to “ECS” → Click Clusters Select your cluster (sample-ECS cluster).
- Click Make a service.
- Choose the frgate → Click The next step.
- Set up the service:
- Task Definition: Choose Sample-Nextjs-Task.
- Cluster: Sample-ACS Cluster.
- Service Name: Sample-Nextjs-Service.
- Number of tasks: 1 (Can measure later).
- Networking Settings:
- Select one Current VPC.
- Select Public all net.
- Enable Auto Assignment Public IP.
- Click The next step → → Make a service.
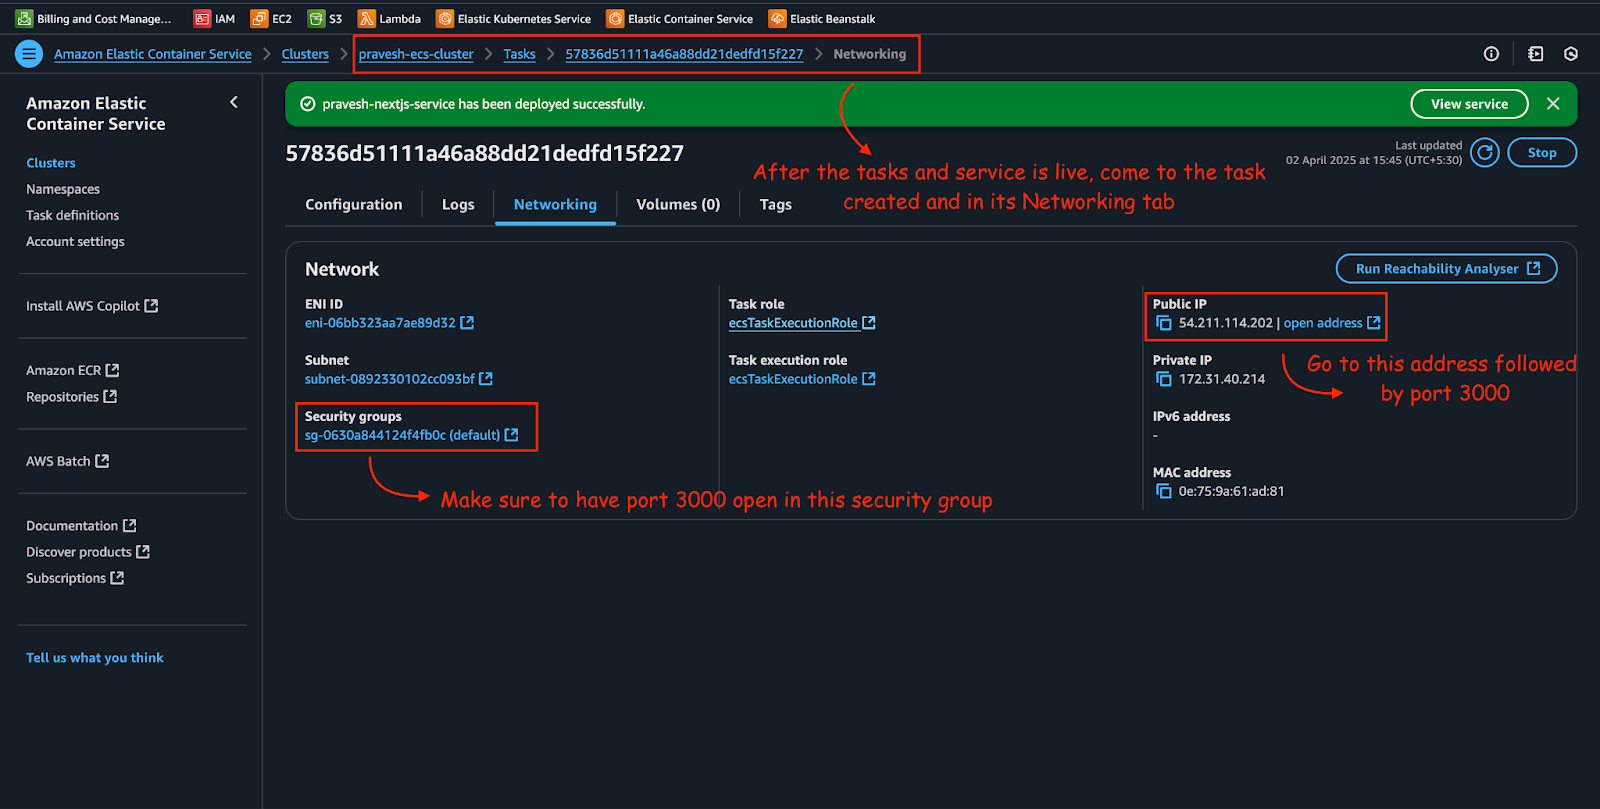
Step 5: Access to Request
- ECS> Clusters> Sample-ACS cluster.
- Click on Tasks tab.
- Click on running work.
- Search Public ip Under it Network.
Open a browser and go:
http: //
Your Next Dot Jay The app should be alive! 🚀 🚀

Conclusion
This indicates the end of the blog. Today, we divided into many AWS services: S3, IAM, ECR, LamBDA function, ECS, Fargate, and API gateway. We started the project by making S3 buckets and eventually deployed our application to the ECS cluster.
In this guide, we covered Next Dot JS app contains containing, pushing it to the ECR, creating ECS Task definitions, and deploying by AWS console. This setup allows automatic scaling, easy updates, and access to secure API.
Creating potential output may include changes below:
- Implementation of more binding IAM permits, improving public access to S3 buckets (Cloud Front, Pre-signed URLs, or Backland Proxy using sample-tamulen-bobkate instead of making public)
- Dealing with error and adding pages (especially for Dynamoid B questions)
- The use of secure VPC/network compositions for ECS (such as direct public IPS instead of application load baller and private sub -net)
- Dynamode BScANP has replaced Scaling concerns within Lambda, which retrieves metadata.
- Hard Coded API Gateway URL in the next dot JS code use environmental variables instead of URL
Unlock Your Business Potential with Stan Jackowski Designs
At Stan Jackowski Designs, we bring your ideas to life with cutting-edge creativity and innovation. Whether you need a customized website, professional digital marketing strategies, or expert SEO services, we’ve got you covered! Our team ensures your business, ministry, or brand stands out with high-performing solutions tailored to your needs.
🚀 What We Offer:
- Web Development – High-converting, responsive, and optimized websites
- Stunning Design & UI/UX – Eye-catching visuals that enhance engagement
- Digital Marketing – Creative campaigns to boost your brand presence
- SEO Optimization – Increase visibility, traffic, and search rankings
- Ongoing Support – 24/7 assistance to keep your website running smoothly
🔹 Take your business to the next level! Explore our outstanding services today:
Stan Jackowski Services
📍 Located: South of Chicago
📞 Contact Us: https://www.stanjackowski.com/contact
💡 Bonus: If you’re a ministry, church, or non-profit organization, we offer specialized solutions, including website setup, training, and consultation to empower your online presence. Book a FREE 1-hour consultation with Rev. Stanley F. Jackowski today!
🔥 Looking for a done-for-you autoblog website? We specialize in creating money-making autoblog websites that generate passive income on autopilot. Let us handle the technical details while you focus on growth!
📩 Let’s Build Something Amazing Together! Contact us now to get started.


